
Want to know how to install a new WordPress theme? It is easy with the help of this step by step guide. There are two different methods for installing a new WordPress theme, depending on whether you have selected a free theme or have purchased and downloaded a premium theme.

In the article How to Find the Right WordPress Theme for Your Blog, we looked at how to pick a free theme using the Feature Filter and what to look for when deciding. We also discussed where to find premium themes for purchase and some considerations to think about when making a purchase. If you found a free theme you like using the Feature Filter, then installation is a breeze and can be accomplished directly from the WordPress Admin Area. Once you use the Feature Filter to find a free theme, follow the installation instructions below.
Install a Free Theme with the WordPress Admin Area
In this example, I searched for a theme with the following attributes; dark, two-column, flexible width. You can see those listed in the search bar as tags. Browse the available selections based on your preferences and pick one you like. Then click Install. In this example, we are installing the theme “Mad Meg”.

After you click Install a popup window will appear asking you to confirm. Go ahead and click Install. The installation process will proceed and you will then see this screen. Click Activate.

Once you click activate you will be returned to the Manage Themes screen. Most themes will ask you to configure the pre-installed widgets. Make sure to do this by clicking the link. Also, browse the themes available customization options, such as Menu, Background, Widgets, etc. Different themes will have different options once installed, but most offer these abilities at a minimum.

Install a Premium WordPress Theme by Uploading a .ZIP File
When you purchase and download a premium theme it will appear as a .ZIP file on your desktop or other designated folder. A .ZIP file is a compressed version of the files necessary to activate the premium theme. To install a premium theme:
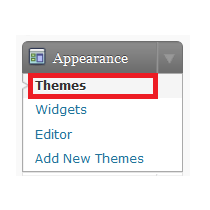
- Scroll down the menu in your WordPress Dashboard and click the down arrow next to Appearance
- Click Themes
- Click Install Themes
- Click Upload

Then find the .ZIP file on your local computer.
- Click Browse to search for the theme file, usually in your desktop or downloads folder.
- Click Install Now.

You will then be taken to an Installation Screen. When the install process is complete click Activate. Your new, premium WordPress theme is online! Browse around the new areas added by your theme, such as Widgets, and configure them to your preferences.
Hey,
I just wanted to share with you our easy online wordpress installer, it is absolutely free to use.
Here is the link: http://www.freewpinstaller.com
Thank you
Thank you SO much! I purchased a theme a year ago but got so bogged down in the challenges of WordPress that I’d abandoned the project completely. Then I finally returned & chose a free theme. Now that I’ve made a little progress on getting up and running, I at least wanted to see what the purchased theme looked like, & your post FINALLY enabled me to do that! Even though I’m sticking with the theme I’d already used, at least now I know how to do this & can go back & tweak things so the new theme I paid for will work with what I’ve done thus far. It’s all such a l-o-n-g learning process. I especially appreciate your very clear screen shots & the obvious red numbered arrows!